Principle: Don’t Repeat Yourself (DRY).
Every concept must have a single, authoritative representation within a system. Reduce repetition of concepts that are likely to change by replacing them with reusable abstractions.
static modifier because we want them to be created within the scope of each object, not the class. This gives the method access to the object instance itself through the this keyword and other items declared in the object, including those with private visibility. We need access to the object in order to effectively manage its internal state.static modifier so as to define the method within the scope of the object. Otherwise, the same rules apply.
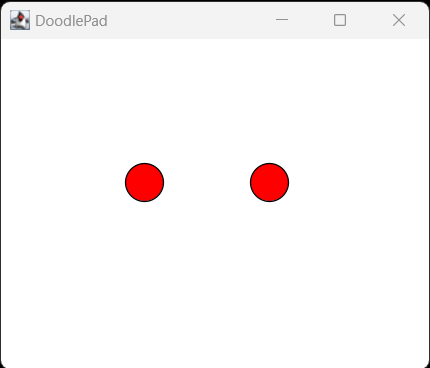
on variable to true and changes the managed Oval fill color to red. Turning it off resets the on variable to false and the Oval fill color back to dark gray. Obtaining the state of the LED simply returns the value of the private on instance variable. We’ll call these methods turnOn(), turnOff(), and isOn(). None of these new methods happen to take parameters.turnOn() and turnOff() methods do what we expect, setting and configuring the state of the object by modifying its private instance variables. The isOn() method returns the boolean value of the on instance variable. Because we have abstracted the concept of the LED being off and on and exposed this behavior as new methods, it is wise to remove the initial explicit instance variable configuration statements from the constructor that starts the LED in the off state and replace them by invoking the turnOff() method directly. This way, should turnOff() be modified later to do more than its current definition, we can feel confident that making the update in one place will apply whenever the LED is turned off.turnOff() method remains consistent. If we decided to change the fill color of the LED when off, and we modified the code in turnOff() but forgot to make the comparable changes to the constructor, we would end up with an inconsistency in our object. The ramifications of making this mistake in this example are minor. But one can imagine how such a similar oversight can lead to more serious problems. This important software development principle has been dubbed Don’t repeat yourself or DRY.turnOff(), we invoke turnOn() in main(…) on both LED objects after instantiation. We also test the state of the first LED object by invoking its isOn() method and printing the result. See the result in Figure 8.3.3.// LED.java (version 4)
// A simple LED display class
import doodlepad.*;
public class LED {
private boolean on; // Tracks state of LED object
private Oval light; // Visual display of object
// Constructor
public LED(double x, double y) {
this.light = new Oval(x, y, 30, 30);
this.turnOff(); // Init state by invoking method (**NEW**)
}
// Turn on LED (**NEW**)
public void turnOn() {
this.on = true;
this.light.setFillColor(255, 0, 0);
}
// Turn off LED (**NEW**)
public void turnOff() {
this.on = false;
this.light.setFillColor(100, 100, 100);
}
// Return state of LED (**NEW**)
public boolean isOn() {
return this.on;
}
// --- Test LED
public static void main(String[] args) {
// Create LED objects
LED led1 = new LED(100, 100);
LED led2 = new LED(200, 100);
// Turn on both LED objects (**NEW**)
led1.turnOn();
led2.turnOn();
System.out.println( "LED1 is" + (led1.isOn() ? "" : " not") + " on");
}
}
LED.java (version 4)javac -cp doodlepad.jar LED.java java -cp .;doodlepad.jar LED LED1 is on

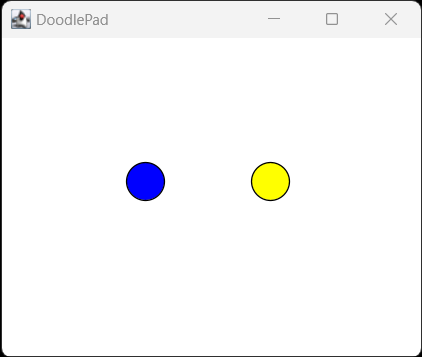
LED.java (version 4)age instance variable to a number greater-than or equal-to 0.0, we could test the value before assigning it in a mutator method. The following setAge(…) mutator method is a simple example.setColor(…) method, a setter, and a getColor() method, a getter. To help with this addition, let’s define an enum with constants for the four LED colors, similar to what we did in Section 2.7.enum LEDColor { RED, GREEN, BLUE, YELLOW };
LEDColor color instance variable to hold an enum constant.setColor(…) method to the class that takes the LEDColor enum constant as a parameter. This limits values to one of the four color constants.getColor() method to the class that returns an LEDColor enum constant.color instance variable in the LED constructorswitch statement to the turnOn() method that sets color based on the value of color instance variable.// LED.java (version 5)
// A simple LED display class
import doodlepad.*;
public class LED {
private boolean on; // Tracks state of LED object
private Oval light; // Visual display of object
private LEDColor color; // LED Color (**NEW**)
// Constructor
public LED(double x, double y) {
this.light = new Oval(x, y, 30, 30);
this.turnOff(); // Init state
this.color = LEDColor.RED; // Default to RED (**NEW**)
}
// Turn on LED
public void turnOn() {
this.on = true;
switch (this.color) { // Set selected color (**NEW**)
case RED:
this.light.setFillColor(255, 0, 0);
break;
case GREEN:
this.light.setFillColor(0, 255, 0);
break;
case BLUE:
this.light.setFillColor(0, 0, 255);
break;
case YELLOW:
this.light.setFillColor(255, 255, 0);
break;
}
}
// Turn off LED
public void turnOff() {
this.on = false;
this.light.setFillColor(100, 100, 100);
}
// Return state of LED
public boolean isOn() {
return this.on;
}
// MUTATOR method for LED Color (**NEW**)
public void setColor(LEDColor color) {
this.color = color;
}
// ACCESSOR method for LED Color (**NEW**)
public LEDColor getColor() {
return this.color;
}
// --- Test LED
public static void main(String[] args) {
// Create LED objects
LED led1 = new LED(100, 100);
LED led2 = new LED(200, 100);
// Change LED colors (**NEW**)
led1.setColor(LEDColor.BLUE);
led2.setColor(LEDColor.YELLOW);
// Turn on both LED objects
led1.turnOn();
led2.turnOn();
System.out.println( "LED1 is" + (led1.isOn() ? "" : " not") + " on");
}
}
// Enum for LED Color constants (**NEW**)
enum LEDColor { RED, GREEN, BLUE, YELLOW };
LED.java (version 5)javac -cp doodlepad.jar LED.java java -cp .;doodlepad.jar LED LED1 is on

LED.java (version 5)setFillColor(…) method of all DoodlePad shape objects. As we know, this method can take the three color components: red, green, and blue, and that is the way we’ve used it. But in fact, there are several other options (overloads) for invoking setFillColor(…).setFillColor(…), which you can observe in the DoodlePad source code 1 . The three-parameter overload of setFillColor(…) just invokes the four-parameter overload with 255 passed as the alpha value./**
* Set the fill color with which to draw the shape
* @param red the red component of the color [0, 255]
* @param green the green component of the color [0, 255]
* @param blue the blue component of the color [0, 255]
*/
public void setFillColor(double red, double green, double blue) {
setFillColor( red, green, blue, 255 ); // Default alpha to 255
}
/**
* Set the gray scale fill color with which to draw the shape.
* @param gray the gray scale value in the range [0, 255]
*/
public void setFillColor(double gray) {
    this.setFillColor(gray, gray, gray, 255);
}
setColor(…) method, let’s overload the constructor with two implementations. The more general implementation takes the LED "on" color as a third parameter, and a two-parameter overload invokes the three parameter implementation with the value LEDColor.RED as the third parameter, making it the default. Note that a constructor overload is invoked using this as the scope instead of the class name, and no new keyword.// Overloaded constructor defaults color to RED
public LED(double x, double y) {
// Invoke alternative constructor with RED as default
this(x, y, LEDColor.RED);
}
// Main constructor expects color constant as a parameter
public LED(double x, double y, LEDColor color) {
this.light = new Oval(x, y, 30, 30);
this.setColor(color); // Set LED on color
this.turnOff(); // Init state
}
toString() Method
toString() and returns a String type. The purpose of this method is to construct and return a String representation of the object. The toString() method is invoked whenever an object is printed using the System.out.println(…) and similar methods.// String representation of an LED object
public String toString() {
return "LED is" + (this.isOn() ? "" : " not") + " on";
}
toString() method for LEDmain(…) method in Listing 8.3.4. As a result, we can now replace the String.out.println(…) method with one that prints the led1 object directly. See the following edit, which produces the same result as in Listing 8.3.4.//System.out.println( "LED1 is" + (led1.isOn() ? "" : " not") + " on");
System.out.println( led1 );
github.com/russomf/doodlepad/blob/master/src/doodlepad/Shape.javagithub.com/russomf/doodlepad/blob/master/src/doodlepad/Shape.java